30 KiB
MaksIT.CertsUI – Modern container-native ACME client with a full WebUI experience
MaksIT.CertsUI is a powerful, container-native ACMEv2 client built to simplify and automate the entire lifecycle of HTTPS certificates issued by Let’s Encrypt. It is an independent, unofficial project and is not affiliated with or endorsed by Let’s Encrypt or ISRG.
Designed for modern infrastructure, it combines a robust WebAPI, intuitive WebUI, and lightweight edge Agent to deliver fully automated certificate issuance, renewal, and deployment across Docker, Podman, and Kubernetes environments. MaksIT.CertsUI supports the HTTP-01 challenge and follows the official Let’s Encrypt guidelines while implementing recommended security and operational best practices.
If you find this project useful, please consider supporting its development:

Table of Contents
- MaksIT.CertsUI – Modern container-native ACME client with a full WebUI experience
Versions History
- 29 Jun, 2019 - V1.0.0
- 01 Nov, 2019 - V2.0.0 (Dependency Injection pattern implementation)
- 31 May, 2024 - V3.0.0 (Webapi and containerization)
- 11 Aug, 2024 - V3.1.0 (Release)
- 11 Sep, 2025 - V3.2.0 New WebUI with authentication
- 15 Nov, 2025 - V3.3.0 Pre release
- 22 Nov, 2025 - V3.3.1 Public release
- 20 Dec, 2025 - V3.3.2 Minimal helm chart and documentation improvements
- 20 Dec, 2025 - V3.3.3 Relicense project from GPL-3.0 to Apache-2.0
Architecture
This solution provides automated, secure management of Let's Encrypt certificates for environments where the edge proxy is behind NAT and certificate management logic runs in a Docker/Podman compose or Kubernetes cluster.
Current Limitations
-
Single Agent Support:
The current implementation supports only a single MaksIT.CertsUI Agent instance. High-availability (HA) or multi-agent deployments are not supported at this time. (Multi-agent/HA support may be added in future releases.) -
No HA Mode:
There is no built-in high-availability mode for the WebAPI or Agent components. This is by design, as the solution targets environments where a single edge proxy and agent are sufficient, and additional complexity is unnecessary. -
HTTP-01 Challenge Only:
Only the HTTP-01 ACME challenge type is supported. DNS-01 and other challenge types are not implemented. -
Single Kubernetes Replica:
The solution is intended for use with a single Kubernetes replica for the MaksIT.CertsUI server and MaksIT.WebUI components.
These limitations are intentional to keep the architecture simple and reliable for typical edge proxy scenarios. Future releases may introduce additional features based on user demand.
Architecture Scheme
                             Edge Proxy (NAT)                 Kubernetes Cluster (Internal Network)
                             +-----------------------+        +----------------------------------------------------+
                             |                       |  HTTP  |  +-----------------------+     +----------------+  |
+-------------------+        |     Reverse Proxy-----|--------|->|                       |     |                |  |
|                   |  ACME  |    (HAProxy/Nginx)    |        |  | MaksIT.CertsUI Server |<--->|  MaksIT.WebUI  |  |
|   Let's Encrypt   |<------>|                       |  HTTP  |  |     (ACME logic)      |     |  (Management)  |  |
|    (Internet)     |  HTTP  | MaksIT.CertsUI Agent<-|--------|--|                       |     |                |  |
|                   |        |    (Edge WebAPI,      |        |  +-----------------------+     +----------------+  |
+-------------------+        |   next to HAProxy)    |        +----------------------------------------------------+
                             |                       |
                             +-----------------------+
                                         |
                                         |
                                         v
                             +-----------------------+
                             |                       |
                             |    Application(s)     |
                             |                       |
                             +-----------------------+
Architecture Description
MaksIT.CertsUI Agent
The MaksIT.CertsUI Agent is a lightweight service responsible for receiving cached certificates from the MaksIT.CertsUI server and deploying them to the local file system used by your reverse proxy (e.g., HAProxy or Nginx). It also handles proxy service reloads to activate new certificates.
Check Agent repository for more details and installation instructions: MaksIT.CertsUI Agent
MaksIT.CertsUI WebUI
The MaksIT.CertsUI WebUI is a user-friendly web interface designed to simplify the management of Let's Encrypt certificates within your infrastructure. With the WebUI, administrators can easily view, import, and export the certificate cache, streamlining certificate operations without the need for direct command-line interaction.
Key Features:
-
Certificate Management Dashboard:
Provides a clear overview of all managed certificates, their status, and expiration dates. -
Import/Export Certificate Cache:
Easily back up or restore your certificate cache. This feature allows you to move certificates between environments or recover from failures without reissuing certificates from Let's Encrypt. -
Redeploy Cached Certificates:
Instantly redeploy existing (cached) certificates to your edge agents or proxies. This avoids unnecessary requests to Let's Encrypt, reducing rate limit concerns and ensuring rapid recovery or migration. -
No Need for Reissuance:
By leveraging the cache import/export and redeploy features, you can restore or migrate certificates without triggering new ACME challenges or consuming additional Let's Encrypt issuance quotas. -
Secure Access:
The WebUI is accessible only via username and password authentication, ensuring that only authorized users can manage certificates.
The WebUI is designed for operational efficiency and security, making certificate lifecycle management straightforward for both small and large deployments.
MaksIT.CertsUI WebAPI
The MaksIT.CertsUI Webapi is the core backend service responsible for orchestrating all certificate management operations in the MaksIT.CertsUI solution. It implements the ACME protocol to interact with Let's Encrypt, handles HTTP-01 challenges, manages the certificate cache, and coordinates certificate deployment to edge agents.
Main Responsibilities:
-
ACME Protocol Handling:
Communicates with Let's Encrypt to request, renew, and revoke certificates using the official ACME protocol. -
Challenge Management:
Receives and responds to HTTP-01 challenge requests, enabling domain validation even when the edge proxy is behind NAT. -
Certificate Cache Management:
Stores issued certificates securely and provides endpoints for importing, exporting, and redeploying cached certificates. -
Agent Coordination:
Sends certificates to edge agents (such as the MaksIT.CertsUI Agent) and instructs them to reload or restart the proxy service to activate new certificates. -
API Security:
All API endpoints are protected by authentication mechanisms (such as API keys), ensuring that only authorized agents and users can perform sensitive operations. -
Integration with WebUI:
Serves as the backend for the MaksIT.CertsUI WebUI, enabling administrators to manage certificates through a secure and intuitive web interface.
The Webapi is designed for deployment in secure environments such as Kubernetes clusters, centralizing certificate management while keeping HTTPS termination and certificate storage at the network edge.
Flow Overview
- ACME Challenge Routing:
- The Edge Proxy (HAProxy/Nginx), running behind NAT, listens for HTTP requests on port80.
- Requests to
/.well-known/acme-challenge/are forwarded via HTTP to the LetsEncrypt Client running in the Kubernetes cluster.
- LetsEncrypt Client (Kubernetes):
- Handles ACME challenge requests, responds to Let's Encrypt for domain validation, and manages certificate issuance.
- The Web UI provides management for certificate operations.
- Certificate Deployment:
- After successful validation and certificate issuance, the LetsEncrypt Client sends the new certificates to the Agent (Edge WebAPI) running on the same machine as the Edge Proxy.
- The Agent stores the certificates in the directory used by the proxy (e.g.,
/etc/haproxy/certs).
- Proxy Reload:
- The LetsEncrypt Client instructs the Agent to reload or restart the Edge Proxy, ensuring the new certificates are used for HTTPS traffic.
- HTTPS Serving:
- The Edge Proxy serves HTTPS traffic to backend applications using the updated certificates.
Key Points:
- The Edge Proxy and Agent are deployed together on the edge server, while the LetsEncrypt Client and Web UI run in Kubernetes.
- All ACME challenge and certificate management logic is centralized in Kubernetes, while certificate storage and HTTPS termination remain at the edge.
- This architecture supports secure automation even when the edge server is not directly accessible from the public internet.
Note: Currently, only HTTP-01 challenges and a single Kubernetes replica are supported by this solution.
MaksIT.CertsUI Server Installation on Linux with Podman Compose
Podman Compose usage to orchestrate multiple MaksIT.CertsUI services on Linux.
Prerequisites
-
sudo dnf install podman-compose -y
-
Create these folders:
/opt/Compose/MaksIT.CertsUI/acme/opt/Compose/MaksIT.CertsUI/cache/opt/Compose/MaksIT.CertsUI/data/opt/Compose/MaksIT.CertsUI/tmp/opt/Compose/MaksIT.CertsUI/configMap/opt/Compose/MaksIT.CertsUI/secrets/opt/Compose/MaksIT.CertsUI/client
Bash command to use:
sudo mkdir -p /opt/Compose/MaksIT.CertsUI/acme \
  /opt/Compose/MaksIT.CertsUI/cache \
  /opt/Compose/MaksIT.CertsUI/data \
  /opt/Compose/MaksIT.CertsUI/tmp \
  /opt/Compose/MaksIT.CertsUI/configMap \
  /opt/Compose/MaksIT.CertsUI/secrets \
  /opt/Compose/MaksIT.CertsUI/client
Create the following files in the appropriate folders:
1. Create the file /opt/Compose/MaksIT.CertsUI/secrets/appsecrets.json with this command:
sudo tee /opt/Compose/MaksIT.CertsUI/secrets/appsecrets.json > /dev/null <<EOF
{
  "Configuration": {
    "Auth": {
      "Secret": "<your-auth-secret>",
      "Pepper": "<your-pepper>"
    },
    "Agent": {
      "AgentKey": "<your-agent-key>"
    }
  }
}
EOF
Note:
Replace placeholder values <your-auth-secret>, <your-pepper>, <your-agent-key>, with secure, your environment-specific values.
Make sure <your-agent-key> matches the key configured in your agent deployment.
2. Create the file /opt/Compose/MaksIT.CertsUI/configMap/appsettings.json with this command:
sudo tee /opt/Compose/MaksIT.CertsUI/configMap/appsettings.json <<EOF
{
  "Logging": {
    "LogLevel": {
      "Default": "Information",
      "Microsoft.AspNetCore": "Warning"
    }
  },
  "Configuration": {
    "Auth": {
      "Issuer": "<your-issuer>",
      "Audience": "<your-audience>",
      "Expiration": 15,
      "RefreshExpiration": 180
    },
    "Agent": {
      "AgentHostname": "http://<your-agent-hostname>",
      "AgentPort": 5000,
      "ServiceToReload": "haproxy"
    },
    "Production": "https://acme-v02.api.letsencrypt.org/directory",
    "Staging": "https://acme-staging-v02.api.letsencrypt.org/directory",
    "CacheFolder": "/cache",
    "AcmeFolder": "/acme",
    "DataFolder": "/data",
    "SettingsFile": "/data/settings.json"
  }
}
EOF
Note:
Replace all JWT-related placeholder values <your-issuer>, <your-audience> and <your-agent-hostname> with your environment-specific values.
3. Create the file /opt/Compose/MaksIT.CertsUI/client/config.js with this command:
sudo tee /opt/Compose/MaksIT.CertsUI/client/config.js <<EOF
window.RUNTIME_CONFIG = {
  API_URL: "http://<your-server-hostname>/api"
};
EOF
Note:
- Replace placeholder value
<your-server-hostname>to tell the client where MaksIT.CertsUI server is running
Running the Project with Podman Compose
In the project root (/opt/Compose/MaksIT.CertsUI), create a new file named docker-compose.yml with the following content:
sudo tee /opt/Compose/MaksIT.CertsUI/docker-compose.yml <<EOF
services:
  reverse-proxy:
    image: cr.maks-it.com/certs-ui/reverseproxy:latest
    container_name: reverse-proxy
    ports:
      - "8080:8080"
    depends_on:
      - certs-ui-client
      - certs-ui-server
    networks:
      - certs-ui-network

  certs-ui-client:
    image: cr.maks-it.com/certs-ui/client:latest
    container_name: certs-ui-client
    volumes:
    - /opt/Compose/MaksIT.CertsUI/client/config.js:/app/dist/config.js:ro
    networks:
      - certs-ui-network

  certs-ui-server:
    image: cr.maks-it.com/certs-ui/server:latest
    container_name: certs-ui-server
    environment:
      - ASPNETCORE_ENVIRONMENT=Production
      - ASPNETCORE_HTTP_PORTS=5000
    volumes:
      - /opt/Compose/MaksIT.CertsUI/acme:/acme
      - /opt/Compose/MaksIT.CertsUI/cache:/cache
      - /opt/Compose/MaksIT.CertsUI/data:/data
      - /opt/Compose/MaksIT.CertsUI/tmp:/tmp
      - /opt/Compose/MaksIT.CertsUI/configMap/appsettings.json:/configMap/appsettings.json:ro
      - /opt/Compose/MaksIT.CertsUI/secrets/appsecrets.json:/secrets/appsecrets.json:ro
    networks:
      - certs-ui-network

networks:
  certs-ui-network:
    driver: bridge
EOF
Note:
- Adjust volume paths if changed
1. Run Podman compose in Rootfull mode (The only supported by podman-compose):
sudo chown -R 1654:1654 /opt/Compose/MaksIT.CertsUI/{data,cache,acme}
sudo chmod -R 775 /opt/Compose/MaksIT.CertsUI/{data,cache,acme}

sudo chown -R 1654:1654 /opt/Compose/MaksIT.CertsUI/tmp
sudo chmod 1777 /opt/Compose/MaksIT.CertsUI/tmp

sudo su -
sudo bash -c 'echo "export PATH=/usr/local/bin:/usr/local/sbin:\$PATH" >> /root/.bashrc'

exit
sudo su -

podman compose -f docker-compose.yml up --build
2. Run Podman compose in Rootless mode (Not supported by podman-compose on Alma10, havent tested):
Correct UID and GID for app user inside container:
[root@test-podman maksym]# podman exec certs-ui-server id -u app
1654
[root@test-podman maksym]# podman exec certs-ui-server id -g app
1654
Then you have to find your subuid and subgid ranges:
[<youruser>@<yourdomain> ~]$ grep $(whoami) /etc/subuid
<youruser>:524288:65536
[<youruser>@<yourdomain> ~]$ grep $(whoami) /etc/subgid
<youruser>:524288:65536
Calculate host UID and GID that maps to container's `app
host_uid = subuid_start + container_uid
         = 524288 + 1654
         = 525942

host_gid = 525942
Apply correct ownership and permissions to the volumes:
sudo chown -R 525942:525942 /opt/Compose/MaksIT.CertsUI/{data,cache,acme}
sudo chmod -R 775 /opt/Compose/MaksIT.CertsUI/{data,cache,acme}

sudo chown -R 525942:525942 /opt/Compose/MaksIT.CertsUI/tmp
sudo chmod 1777 /opt/Compose/MaksIT.CertsUI/tmp
Then run podman compose as normal user:
podman compose -f docker-compose.yml up --build
This command builds and starts the following services:
- reverse-proxy: Exposes both
certs-ui-clientandcerts-ui-serveron the same hostname. - certs-ui-client: The WebUI for managing certificates.
- certs-ui-server: The backend server handling ACME logic and certificate management.
Stop the services:
Press Ctrl+C in the terminal, then run:
podman compose -f docker-compose.yml down
MaksIT.CertsUI Server Installation on Windows with Docker Compose
Use Docker Compose to orchestrate multiple MaksIT.CertsUI services on Windows.
Prerequisites
- Docker Desktop (includes Docker Compose)
- Create these folders:
C:\Compose\MaksIT.CertsUI\acmeC:\Compose\MaksIT.CertsUI\cacheC:\Compose\MaksIT.CertsUI\dataC:\Compose\MaksIT.CertsUI\tmpC:\Compose\MaksIT.CertsUI\configMapC:\Compose\MaksIT.CertsUI\secrets
Powershell command to use:
New-Item -Path `
  'C:\Compose\MaksIT.CertsUI\acme', `
  'C:\Compose\MaksIT.CertsUI\cache', `
  'C:\Compose\MaksIT.CertsUI\data', `
  'C:\Compose\MaksIT.CertsUI\tmp', `
  'C:\Compose\MaksIT.CertsUI\configMap', `
  'C:\Compose\MaksIT.CertsUI\secrets' `
  -ItemType Directory -Force
Secrets and Configuration
Create the following files in the appropriate folders:
1. Create the file C:\Compose\MaksIT.CertsUI\secrets\appsecrets.json with this command:
Set-Content -Path 'C:\Compose\MaksIT.CertsUI\secrets\appsecrets.json' -Value @'
{
  "Configuration": {
    "Auth": {
      "Secret": "<your-auth-secret>",
      "Pepper": "<your-pepper>"
    },
    "Agent": {
      "AgentKey": "<your-agent-key>"
    }
  }
}
'@
Note:
Replace placeholder values <your-auth-secret>, <your-pepper>, <your-agent-key>, with secure, your environment-specific values.
Make sure <your-agent-key> matches the key configured in your agent deployment.
2. Create the file C:\Compose\MaksIT.CertsUI\configMap\appsettings.json with this command:
Set-Content -Path 'C:\Compose\MaksIT.CertsUI\configMap\appsettings.json' -Value @'
{
  "Logging": {
    "LogLevel": {
      "Default": "Information",
      "Microsoft.AspNetCore": "Warning"
    }
  },
  "Configuration": {
    "Auth": {
      "Issuer": "<your-issuer>",
      "Audience": "<your-audience>",
      "Expiration": 15,
      "RefreshExpiration": 180
    },
    "Agent": {
      "AgentHostname": "http://<your-agent-hostname>",
      "AgentPort": 5000,
      "ServiceToReload": "haproxy"
    },
    "Production": "https://acme-v02.api.letsencrypt.org/directory",
    "Staging": "https://acme-staging-v02.api.letsencrypt.org/directory",
    "CacheFolder": "/cache",
    "AcmeFolder": "/acme",
    "DataFolder": "/data",
    "SettingsFile": "/data/settings.json"
  }
}
'@
Note:
Replace all JWT-related placeholder values <your-issuer>, <your-audience> and <your-agent-hostname> with your environment-specific values.
3. Create the file C:\Compose\MaksIT.CertsUI\client\config.js with this command:
Set-Content -Path 'C:\Compose\MaksIT.CertsUI\client\config.js' -Value @'
window.RUNTIME_CONFIG = {
  API_URL: "http://<your-server-hostname>:8080/api"
};
'@
Note:
- Replace placeholder value
<your-server-hostname>to tell the client where MaksIT.CertsUI server is running
Running the Project with Docker Compose
In the project root (C:\Compose\MaksIT.CertsUI), create a new file named docker-compose.yml with the following content:
Set-Content -Path 'C:\Compose\MaksIT.CertsUI\docker-compose.yml' -Value @'
services:
  reverse-proxy:
    image: cr.maks-it.com/certs-ui/reverseproxy:latest
    container_name: reverse-proxy
    ports:
      - "8080:8080"
    depends_on:
      - certs-ui-client
      - certs-ui-server
    networks:
      - certs-ui-network

  certs-ui-client:
    image: cr.maks-it.com/certs-ui/client:latest
    container_name: certs-ui-client
    volumes:
    - C:\Compose\MaksIT.CertsUI\client\config.js:/app/dist/config.js:ro
    networks:
      - certs-ui-network

  certs-ui-server:
    image: cr.maks-it.com/certs-ui/server:latest
    container_name: certs-ui-server
    environment:
      - ASPNETCORE_ENVIRONMENT=Production
      - ASPNETCORE_HTTP_PORTS=5000
    volumes:
      - C:\Compose\MaksIT.CertsUI\acme:/acme
      - C:\Compose\MaksIT.CertsUI\cache:/cache
      - C:\Compose\MaksIT.CertsUI\data:/data
      - C:\Compose\MaksIT.CertsUI\tmp:/tmp
      - C:\Compose\MaksIT.CertsUI\configMap\appsettings.json:/configMap/appsettings.json:ro
      - C:\Compose\MaksIT.CertsUI\secrets\appsecrets.json:/secrets/appsecrets.json:ro
    networks:
      - certs-ui-network

networks:
  certs-ui-network:
    driver: bridge
'@
Note:
- Adjust volume paths if changed
docker compose -f docker-compose.yml up --build
This command builds and starts the following services:
- reverse-proxy: Exposes both
certs-ui-clientandcerts-ui-serveron the same hostname. - certs-ui-client: The WebUI for managing certificates.
- certs-ui-server: The backend server handling ACME logic and certificate management.
Stop the services:
Press Ctrl+C in the terminal, then run:
docker compose -f docker-compose.yml down
MaksIT.CertsUI Server installation on Kubernetes
The MaksIT.CertsUI Helm chart is distributed via the MaksIT container registry using the Helm OCI (Open Container Initiative) protocol.
What is Helm OCI?
Helm OCI support enables you to pull and install Helm charts directly from container registries (such as Harbor, Docker Hub, or GitHub Container Registry), just like you would with Docker images. This approach is secure, versioned, and recommended for modern Kubernetes deployments.
2. Prepare Namespace, Secrets, and ConfigMap
Before installing the Helm chart, create a dedicated namespace and provide the required secrets and configuration for the MaksIT.CertsUI Webapi.
Step 1: Create Namespace
kubectl create namespace certs-ui
Step 2: Create the Secret (appsecrets.json)
Replace the placeholder values with your actual secrets. This secret contains authentication and agent keys required by the Webapi.
{
  "Auth": {
    "Secret": "<your-auth-secret>",
    "Pepper": "<your-pepper>"
},
  "Agent": {
    "AgentKey": "<your-agent-key>"
  }
}
kubectl create secret generic certs-ui-server-secrets \
  --from-literal=appsecrets.json='{
    "Auth": {
      "Secret": "<your-auth-secret>",
      "Pepper": "<your-pepper>"
    },
    "Agent": {
      "AgentKey": "<your-agent-key>"
    }
  }' \
  -n certs-ui
Note:
Replace placeholder values <your-auth-secret>, <your-pepper>, <your-agent-key>, with secure, your environment-specific values.
Make sure <your-agent-key> matches the key configured in your agent deployment.
Step 3: Create the ConfigMap (appsettings.json)
Edit the values as needed for your environment. This configmap contains application settings for logging, authentication, agent configuration, and ACME endpoints.
{
  "Logging": {
    "LogLevel": {
    "Default": "Information",
    "Microsoft.AspNetCore": "Warning"
  }
},
  "Configuration": {
    "Auth": {
      "Issuer": "<your-issuer>",
      "Audience": "<your-audience>",
      "Expiration": 15,
      "RefreshExpiration": 180
    },
    "Agent": {
      "AgentHostname": "http://<your-agent-hostname>",
      "AgentPort": 5000,
      "ServiceToReload": "haproxy"
    },
    "Production": "https://acme-v02.api.letsencrypt.org/directory",
    "Staging": "https://acme-staging-v02.api.letsencrypt.org/directory",
    "CacheFolder": "/cache",
    "AcmeFolder": "/acme",
    "DataFolder": "/data",
    "SettingsFile": "/data/settings.json"
  }
}
kubectl create configmap certs-ui-server-configmap \
  --from-literal=appsettings.json='{
    "Logging": {
      "LogLevel": {
        "Default": "Information",
        "Microsoft.AspNetCore": "Warning"
      }
    },
    "Configuration": {
      "Auth": {
        "Issuer": "<your-issuer>",
        "Audience": "<your-audience>",
        "Expiration": 15,
        "RefreshExpiration": 180
      },
      "Agent": {
        "AgentHostname": "http://<your-agent-hostname>",
        "AgentPort": 5000,
        "ServiceToReload": "haproxy"
      },
      "Production": "https://acme-v02.api.letsencrypt.org/directory",
      "Staging": "https://acme-staging-v02.api.letsencrypt.org/directory",
      "CacheFolder": "/cache",
      "AcmeFolder": "/acme",
      "DataFolder": "/data",
      "SettingsFile": "/data/settings.json"
    }
  }' \
  -n certs-ui
Note:
Replace all JWT-related placeholder values <your-issuer>, <your-audience> and <your-agent-hostname> with your environment-specific values.
Step 4: Create the ConfigMap (config.json)
Edit the values as needed for your environment. This configmap contains client settings to connect backend.
window.RUNTIME_CONFIG = {
  API_URL: "http://<your-server-hostname>/api"
};
kubectl create configmap certs-ui-client-configmap \
  --from-literal=config.js='
    window.RUNTIME_CONFIG = {
      API_URL: "http://<your-server-hostname>/api"
    };' \
  -n certs-ui
Note:
Replace <your-server-hostname> with the actual hostname or IP address where your MaksIT.CertsUI server is configured.
This ConfigMap provides the client-side runtime configuration for the WebUI to connect to the backend API.
3. Create a Minimal Custom Values File
Below is a minimal example of a custom-values.yaml for most users. It sets the storage class for persistent volumes, and configures the reverse proxy service. You can further customize this file as needed for your environment.
global:
  imagePullSecrets: []  # Keep empty

components:
  server:
    persistence:
      storageClass: local-path

  reverseproxy:
    service:
      enabled: true
      type: ClusterIP
      port: 8080
      targetPort: 8080
4. Install the Helm Chart
Install the MaksIT.CertsUI chart using your custom values file.
On Linux:
helm upgrade certs-ui oci://cr.maks-it.com/charts/certs-ui \
  -n certs-ui \
  -f custom-values.yaml \
  --version 3.3.3 \
*On Windows PowerShell:
helm upgrade certs-ui oci://cr.maks-it.com/charts/certs-ui `
  -n certs-ui `
  -f custom-values.yaml `
  --version 3.3.3 `
Note:
Chart version follows app version. To install a specific version, use the --version flag:
5. Uninstall the Helm Chart
To uninstall the MaksIT.CertsUI chart and remove all associated resources, run the following command:
On Linux:
helm uninstall certs-ui oci://cr.maks-it.com/charts/certs-ui \
  -n certs-ui
On Windows PowerShell:
helm uninstall certs-ui oci://cr.maks-it.com/charts/certs-ui `
  -n certs-ui-test
MaksIT.CertsUI Interface Overview
The MaksIT.CertsUI interface provides a user-friendly web dashboard for managing Let's Encrypt certificates in your environment. Below is a step-by-step guide to getting started with the WebUI:
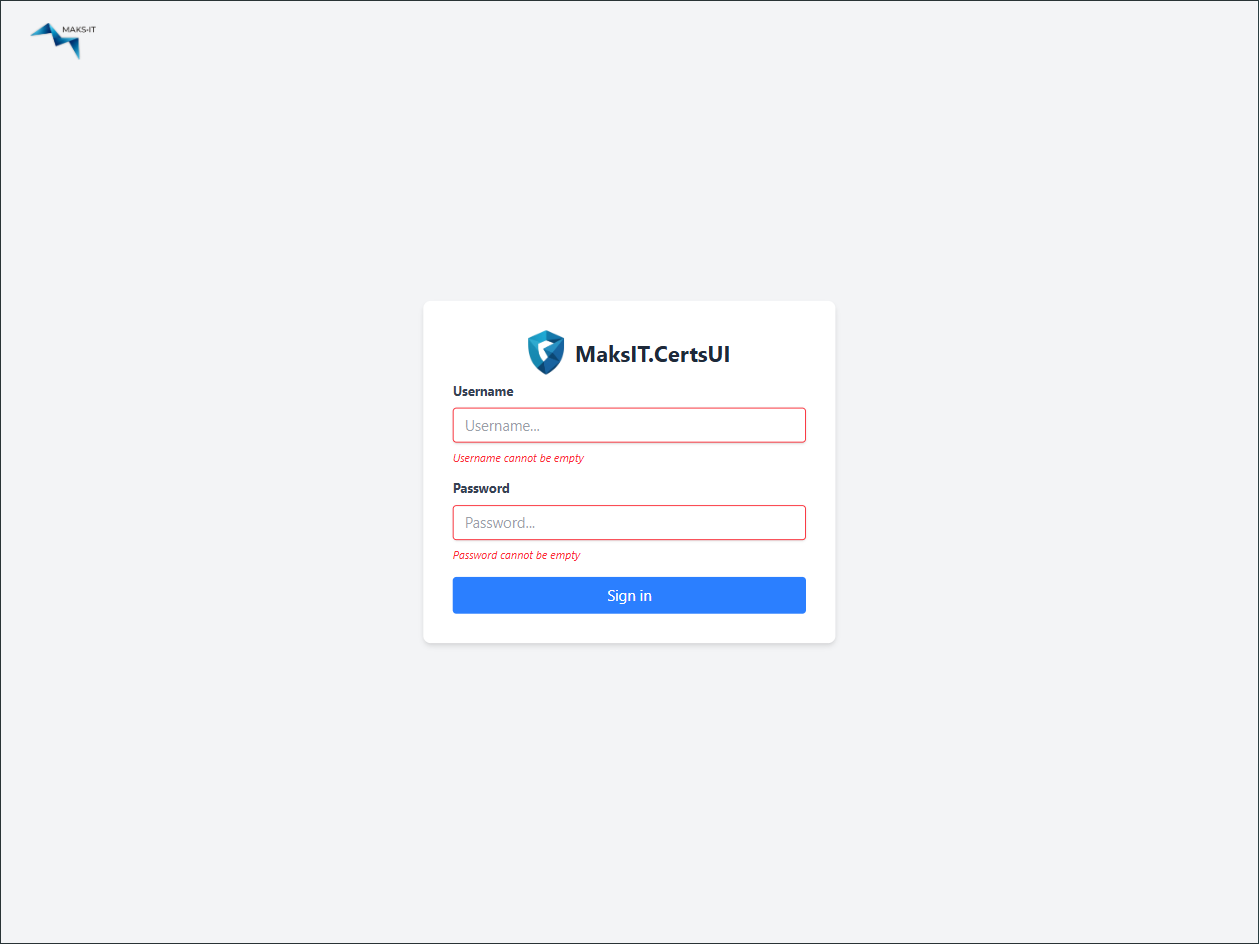
- First Login: Open the client in your browser. Default credentials:
- Username:
admin - Password:
password
Important: Change the default password immediately after logging in for the first time for security.
-
Change the Default Password:
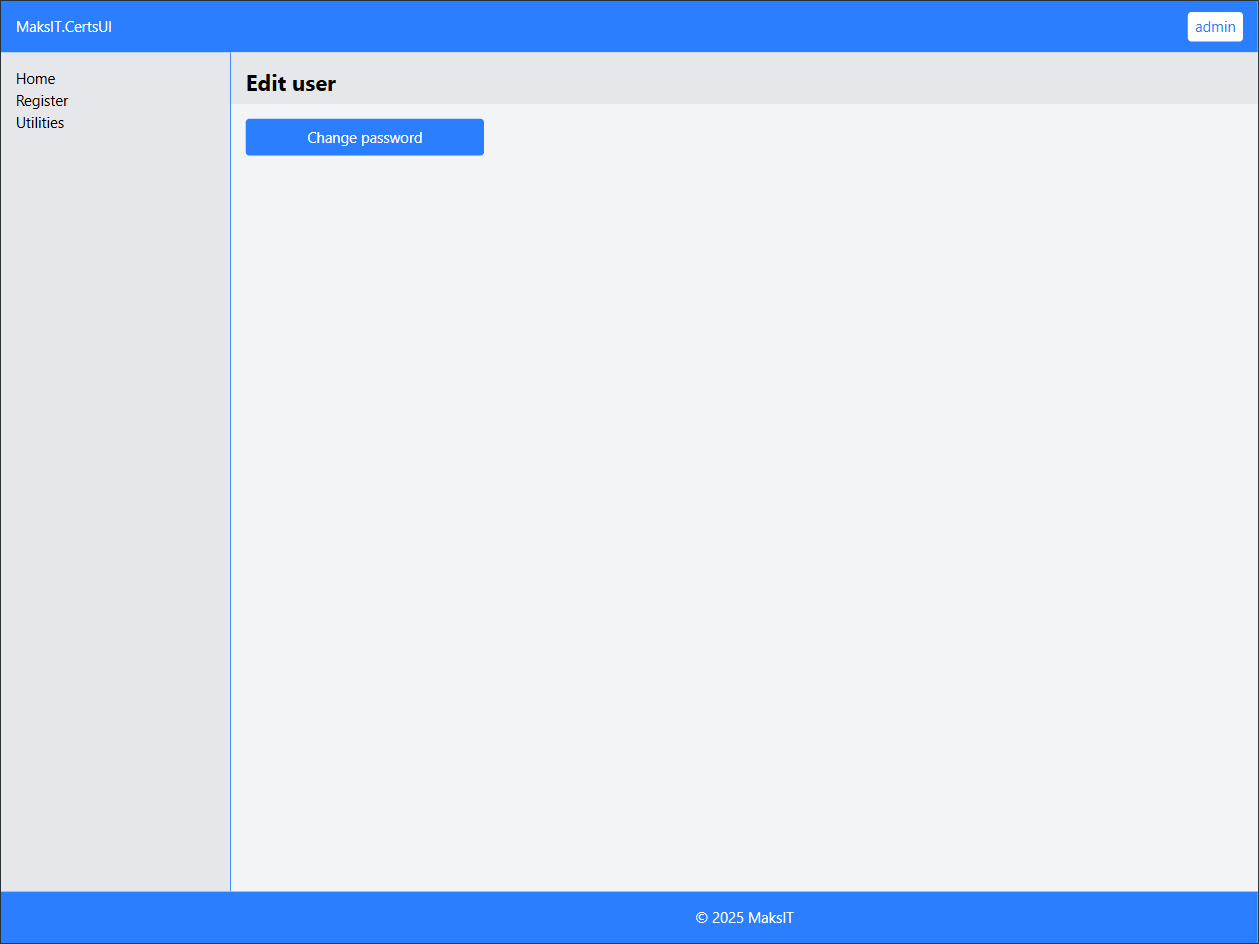
Click on the admin username in the top right corner and select Edit User.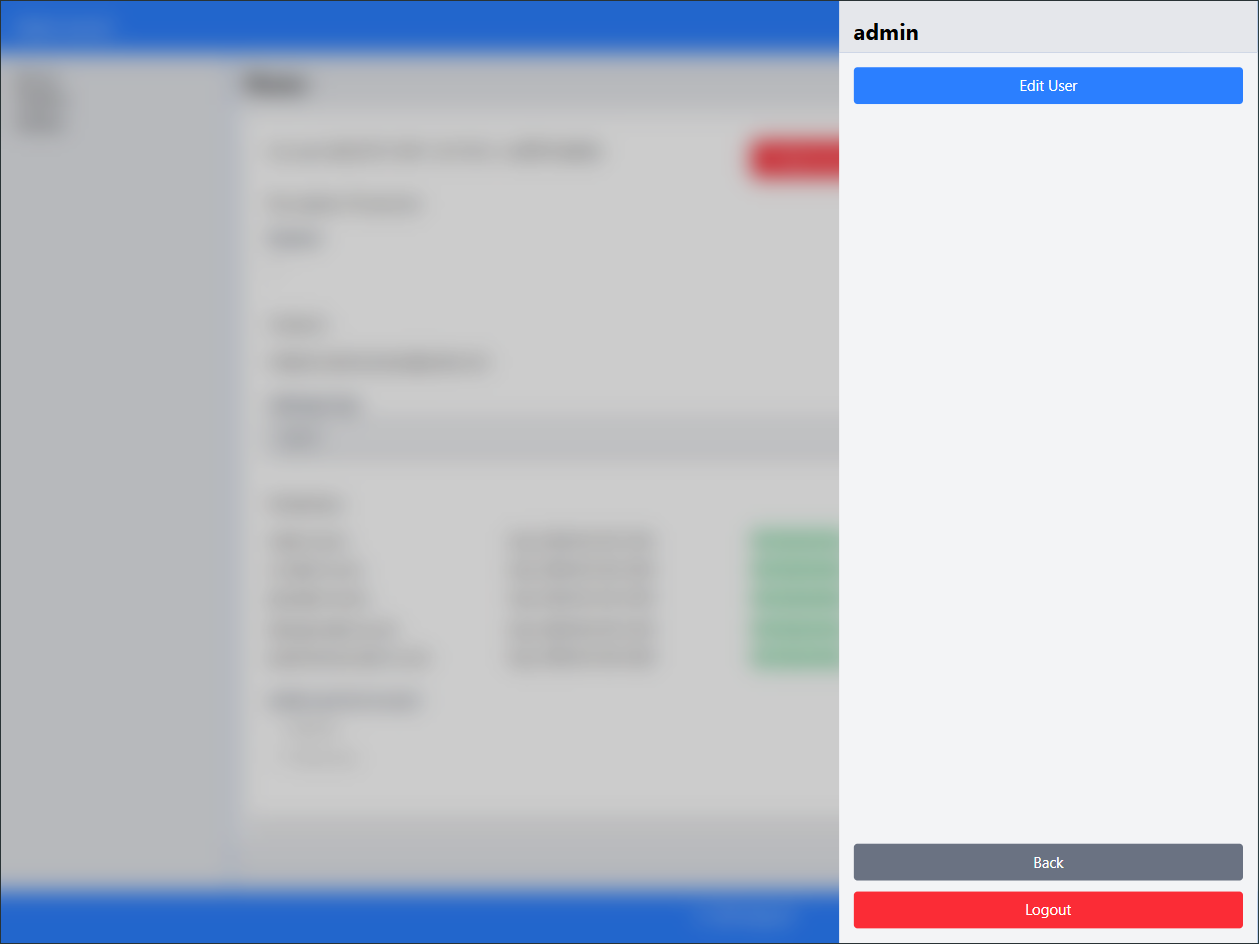
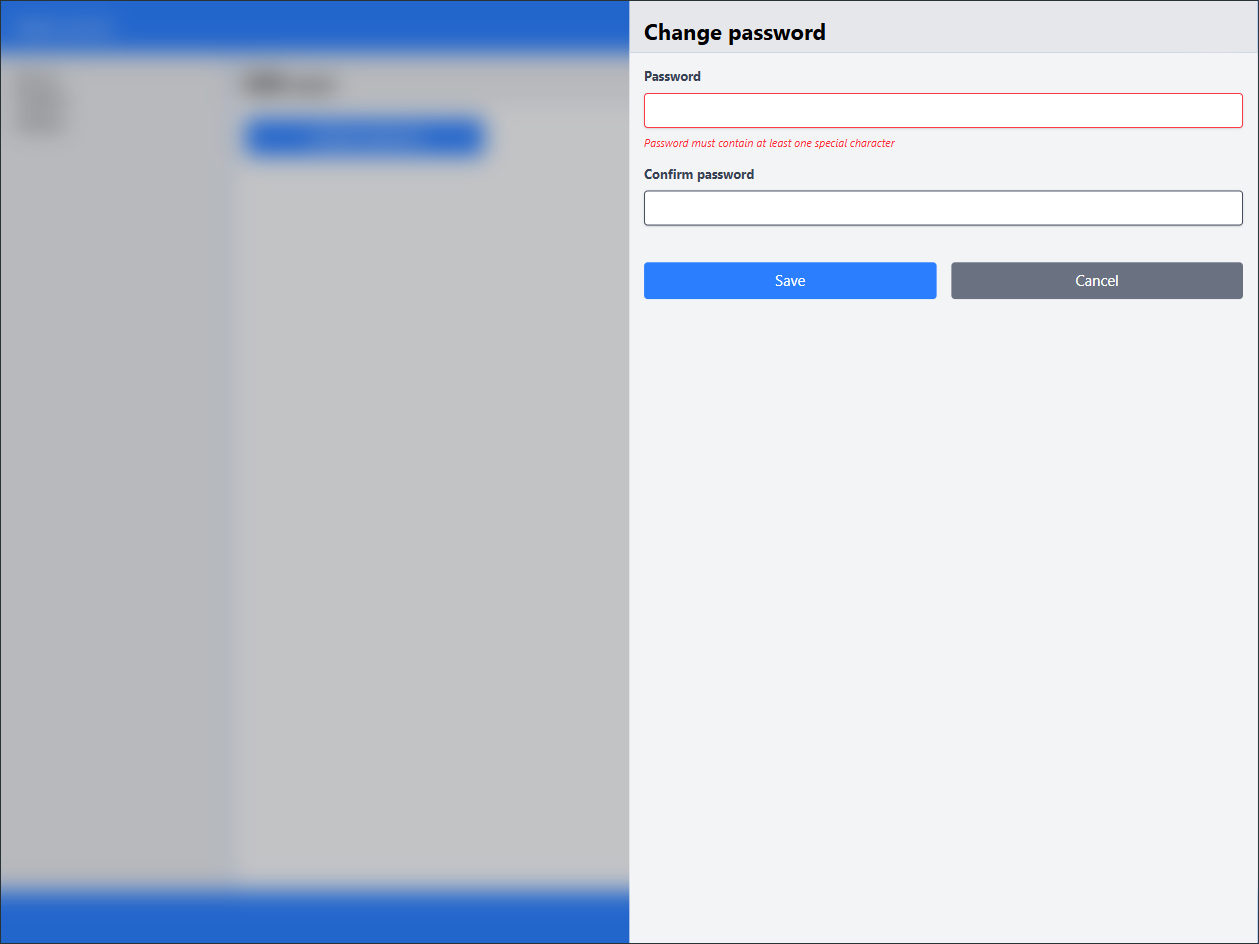
Go to Change password.
Enter a strong, alphanumeric password with special characters.
-
Verify Agent Connectivity:
Before registering certificates, ensure the agent is properly configured and available.
Go to Utilities and click Test agent. If everything is set up correctly, a "Hello World!" toast notification will appear.
-
Register a New Account:
Proceed to register a new account and fill in the required fields.
Tip: Start with a few hostnames and gradually add 3 or 4 at a time.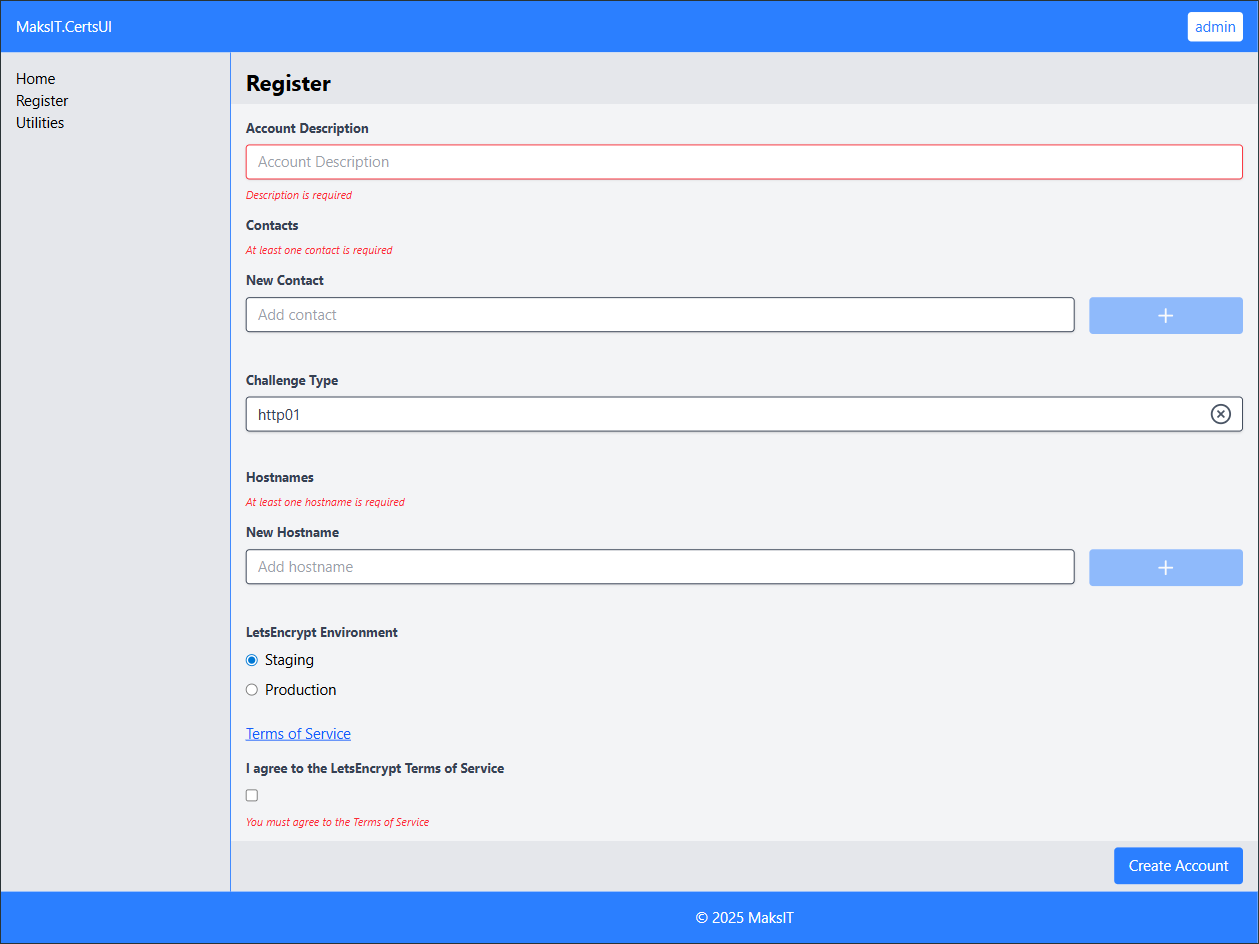
-
View and Manage Certificates:
If registration is successful, your new account will be created and you will see a list of obtained certificates along with their expiration dates.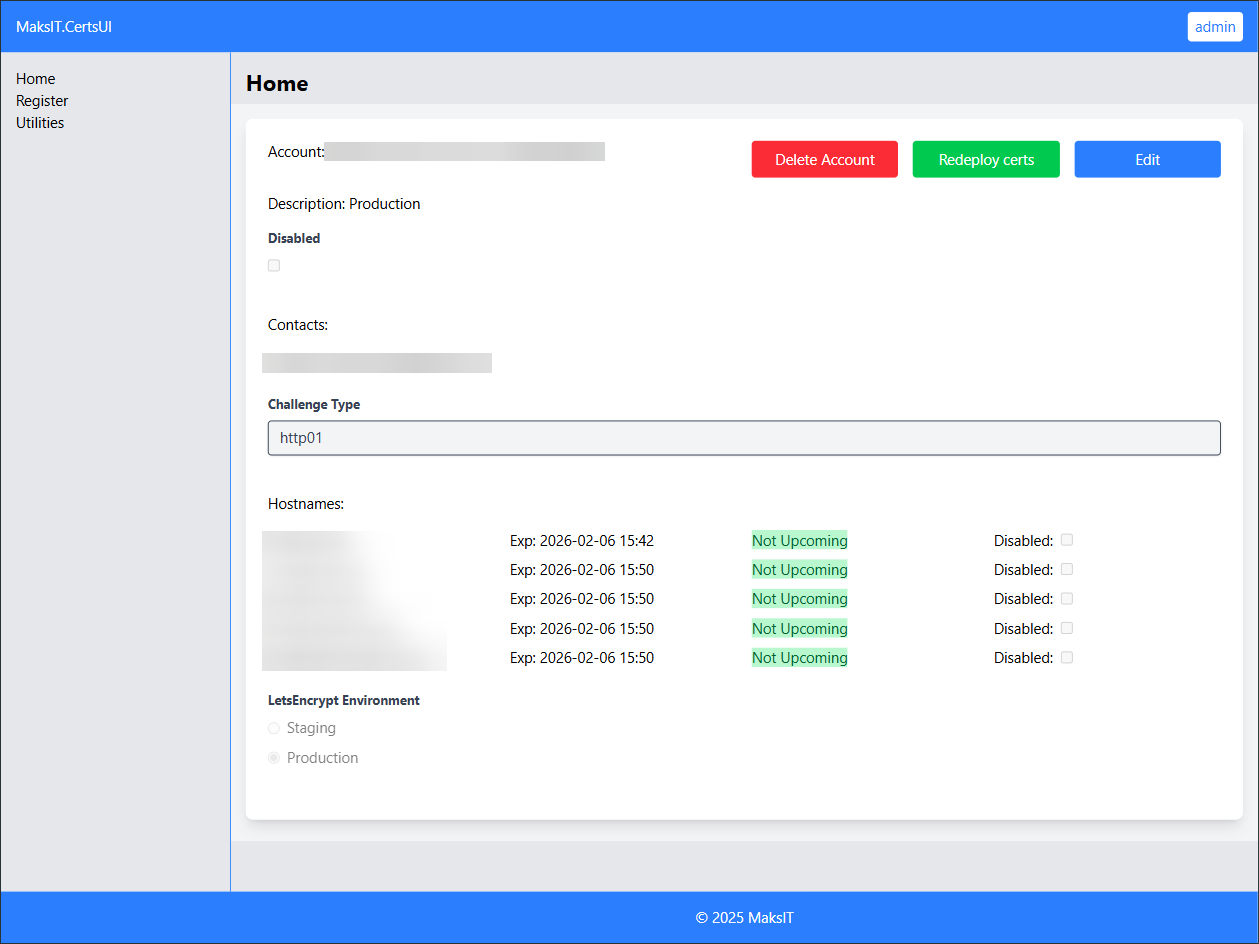
The WebUI streamlines certificate management, making it easy to change credentials, verify agent status, and monitor certificate lifecycles.
Contact
For any inquiries or contributions, feel free to reach out:
- Email: maksym.sadovnychyy@gmail.com
- Author: Maksym Sadovnychyy (MAKS-IT)